Sunday, December 30, 2012

Home-grown Goodness!

Not sure if I mentioned it before, but this year, my mother-in-law helped me start a winter garden.  Since we live in FL, that's pretty much a regular garden to those of you up North.  We planted tomatoes, onions of all shapes and sizes, peppers, broccoli, cauliflower, peas, carrots, beans, lettuce, swiss chard, squash, radishes and cucumbers.  Whew!  That was quite a list!  Not everything survived...we lost the cucumbers and squash and the peppers never got big enough...maybe next year!  
Garden in late October

Anyway...I just wanted to share the progress with you!  A while back, I started harvesting the green onions. Those suckers grow fast!  The great thing about them is after you snip them, they grow back.  I also picked some lettuce a while ago and a few radishes.  Today, I picked a bunch of green onions and chives, tomatoes, and green beans!  I'm so proud of my small bounty and I just couldn't contain myself.  I am very excited to cook and eat my veggies.  

My veggies!!  Chives, green onions, green beans, tomatoes.

Just a little note to those of you who don't think you can do this kind of thing...I have the blackest of black thumbs.  Seriously...I've killed an aloe plant...who does that?  It's a freaking cactus!  Yup, I did it.  I'm shocked that I've been able to keep multiple plants alive long enough to actually grow food...so if I can do it, anyone can do it.  All I've been doing to maintain my garden is watering it every day (sometimes less depending on the rain/humidity), and Miracle Grow once a week.
Another little thing I did was mix used coffee grounds into the soil.  You can pick these up for free from your local Starbucks.  Mine has a little area outside where they will bag up 5 lbs of grounds and leave them for your garden.  If you don't see any at yours, try asking...most locations are happy to let you take their used coffee. Why coffee grounds?  Glad you asked!  Brewed grounds add nitrogen to the soil which is a valuable nutrient for growing plants.  They also help to keep away snails and slugs!

I suspect he knows the big one is his...
Well readers, I hope you all had a wonderful holiday season.  Our family had a great Christmas...three of them, to be exact.  We spent a day with my mom and sister on the 22nd.  We opted out of the traditional Christmas dinner in favor of steaks and twice baked potatoes followed by a trip to SeaWorld.  This being Ayden's first trip to the park, he really enjoyed Shamu and the fireworks the most.  On Christmas day, we spent the day with Aaron's family snacking on all our favorite appetizers including my 'famous' spinach and artichoke dip (recipe coming soon) and the family trivia game.  Our third and final Christmas celebration was another trip to Aaron's family's house for a lovely ham dinner with his grandmother.  We feel so blessed to have such a wonderful family to spend time with.  We're really looking forward to the new year and wish you all nothing but the very best in 2013!

Tuesday, December 25, 2012

Last Minute Christmas

Merry Christmas, All!  I hope you're all enjoying your holiday traditions with the ones you love the most!  Now if you're like me, you probably got your shopping done early...I was finished by mid October.  What can I say, I'm not a patient person.  However, it seems like no matter how much I plan in advance, I always end up buying a gift at the last minute.  Sometimes, like today, it works to my benefit.

My two closest friends and I are all planning to get together sometime after the holidays to exchange gifts and have a 'girls day' since we all are so busy with our families.  Also, one of my friends JUST had her baby a few weeks ago.  So yeah, there was just no way we were getting together anytime soon.  Which brings me to my problem...

I had originally planned to make their gift this year.  As in, I was going to make and bring them a butt-load of cookies and candy.  I made two kinds of fudge, caramels, and a variety of cookies.  I even dipped marshmallows in chocolate for hot cocoa treats.  I spray painted all my ugly old tins a beautiful antiqued copper and dolled them up with ribbons to hold all my little confections.  And they made excellent gifts for all our other friends.  Buuuutttttt...they won't be good by the time I get to my girlfriends.  Boo :-(

So when the fiance (I just love saying that now!) asked me to go out to Old Time Pottery today to pick up a last minute gift for him (yeah...he's one of THOSE people) I figured I'd take a peek and see what I could come up with for my girls.

All of us having had babies in the last year, I figured what we all needed most was relaxation.  So I went with a spa basket.  Yes, yes, yes, these are a tad overdone but hear me out...it's all consumable stuff or at the very least USEFUL stuff.  So I'm not crowding their cabinets with a random painted wine glass or their walls with another picture frame.  And the best part is these LOOK really cute but they didn't cost me a lot!


Items included in my baskets:

  • One plastic utility tote-they're small, yes, but they will work perfectly to hold bath soaps and stuff or for something else around the house.
  • Two washcloths
  • A long, braided loofah
  • A small candle
  • Apricot scrub
  • A small bag of truffles- you can't have a luxurious spa day without some chocolate!
  • Argon Oil shampoo and conditioner (trial sized)- I know I would never purchase these for myself because the full size is so expensive, so I thought it'd be nice in the basket
  • Nivea Soft moisturizing cream- this is a multitasker since it can be used on 
  • One pair of super fuzzy socks

Each basket cost me approximately $10. I could have easily cut the cost down a little more by purchasing a less expensive shampoo/conditioner set or by using tissue paper instead of the washcloths.  That's the great thing about gift baskets...you can really make a little money go far.  My best tips are to not spend a lot on packaging- if they don't have a use for the basket or tote you give them, they will probably just throw it out and there went serious $$$ out the window.  Don't stress over the size of the items you put into it.  Bigger is not always better; you can put a bunch of sample sizes in and get a good variety.  On the other hand, don't go crazy on a bunch of little things...the price can add up fast.  You could spend $1 a piece on 20 items that are tiny or you could spend $20 and get a four larger items that may look nicer in a basket.  Go with a theme...spa (and choose a color/scent), cooking (choose a cuisine or a specific meal), etc. 

One more note on the packaging:  when in doubt, go a size DOWN.  An overstuffed/overflowing basket looks way better than a sparse one.  If you found or already have a basket that you want to use but are struggling to fill it up, think inexpensive things that take up a lot of real estate...towels (you could even line a cooking themed basket with a kitchen towel or a couple cloth napkins), candies (kisses, mints, etc), or even use some paper shreds (you can find these in the gift wrap aisle).  


Saturday, December 1, 2012

Christmas Gift Wrap

Ever heard the saying, "you eat with your eyes first,"?  I 100% agree with that and I like to take it a step further...  I believe when you receive a beautifully wrapped package, you instantly get excited about what's inside.  I also believe that festive gifts can really make your home look like it's ready for Christmas!

These are my first few gifts that I got to wrapping this year.  Aren't they pretty?  Here's how I made them look so nifty:

The center gift is wrapped in plain brown packing paper...not unlike a paper bag, but in a roll.  I found mine on sale at Walgreens, but you can find this stuff anywhere they sell office supplies.  I tied a ribbon around it vertically with no bow but extra give in the front allowing for the gather.  I used red curling ribbon to cinch the middle and attached two jingle bells and a glittery gold "Merry Christmas" ornament (both purchased at the dollar store...bells 9/$1 and ornaments 5/$1).  

The gift on the right is a plain red bag with two floral picks attached and a bow in the middle...all of that also from the dollar store.  

Not bad, huh?  There are lots of ways to make your gifts look extra special without spending a lot on fancy wrapping paper and big bows.  If you have some tips, please share in the comments below!

Sunday, November 18, 2012

Big News!

Well it's official...we're engaged!  Finally!  After being together for 5 years...yeah that's right, 5...and one sweet baby boy, we're finally tying the knot!  Aaron's proposal was definitely 'him' and so sweet.  Want to know how he did it?  Glad you asked!

The ring!
We were having a few friends over for a bonfire and of course, I had no hot dogs in the house.  So my friend Carl, and I went to the store to get some.  When we arrived back home, Aaron was waiting in the yard for me and excitedly told me that I have to see what he and Bobby did with the Christmas lights on the roof.  I looked and didn't see anything, so I was really confused.  He told me, "No no no, you have to go ON the roof to see it!"  Seriously?!  God made me short for a reason...I hate being that high off the ground!  Reluctantly, I climbed the ladder to the roof and once to the top, I saw a path of candles leading me over the thatch of the roof.  On the ground below in the backyard, waited a huge heart of Christmas lights with the words "marry me" in the middle and Aaron on one knee, our song playing in the background.  It was a great moment and I couldn't be happier!


Now, this is a blog with fun tips, so I'll be incorporating wedding tips in here as I find them!  We've set the date for March 31st, 2013.  Yup, not a lot of time, but I'm confident we can pull it together!  Stay tuned!

Monday, November 12, 2012

Baby's First Birthday Party

Well it's official.  My little boy is ONE!  Where in the heck did the year go?!  I thought he and I agreed that he was going to stay little forever.  Little stinker went back on our deal.  Oh well...guess it's party time, then!

I'm sure many of you have seen all the crazy parties for one year olds online and desperately want to do all those fun things for your baby.  I'm here to tell ya...it's not worth the money!  Don't get me wrong, I had the same urge.  I was going to make custom invitations complete with photos and embellishments and then I was going to made little party favor bags...and then I realized how much all that was going to cost me.  I mean, really, he's one and he won't remember any of this stuff...so why not use that cash for something he will enjoy like more toys??  Want to know what items I saved or splurged on?  Here ya go!

1. Invitations
I opted to save myself postage and save a few trees by using Punchbowl.com.  It's an awesome site...can't say enough good thing about them.  They have all kinds of fun features to go along with the invites, but I'll get to that later.


2.  Food
My first instinct was to serve a meal since it's mostly family with a few close friends.  But mealtime with Ayden is quite the production, so I figured it'd be better to go light on food and keep the party flowing.  I put out two kinds of chips, dip, and a veggie tray that my mom brought.  The veggies were perfect for the little ones at the parties because they're healthy and bite sized.  Obviously, we had a cake and this is where I splurged a little.  Sure, I could have baked one myself, but Publix offers a free smash cake for the babies first birthday when you order a sheet cake.  PLUS, I got a $4 off coupon for the cake from the Publix Baby Club.  So...for a 1/4 sheet cake and a smash cake, I spent $18.  Not bad!

3. Decorations
Here's where I REALLY had to restrain myself.  There are so many cute decorations out there.  It's very easy to get carried away!  I had to resist the urge to buy out Party City because they had the cutest stuff (I  did break down and buy the plates and napkins).  Thankfully, a friend of mine already used the same pattern for her son's birthday, so she gave me the leftover party hats, candle and a few napkins.  Instead of the themed stuff, I bought a few rolls of streamers and a plastic table cover.  My mother-in-law already had balloons and another table cover, so I didn't have to buy any of that.  So our decor was entirely made of streamers and balloons and I think it turned out spectacular!  I also put out Ayden's baby book and a couple of photo books from Shutterfly.com that I made.  It's much more fun to look at those than to clutter the table with disposable decor!
Clockwise from left: time capsule, photo albums, smash cake, sheet cake.
Snack table..veggies were still in the fridge when we took the picture...oops!
Ayden's chair...streamers, ribbon and ballons, oh my!

4.  Fun Extras
We opted to make a time capsule for Ayden to open on his 18th birthday.  We asked every guest to select one item that represented 2012 and add it to our box.  We got a lot of fun stuff for him to check out, some things we got: a newspaper from the day of his birthday (happened to be the day after the election, so it'll be really cool to read in 18 years), a stock report, an angry birds game, magazines showcasing celebrities, fashion and decor styles that are popular now.  We also had a few personal letters from family members including Ayden's Great-Grandma.  Those will be so sweet for him to read when he's an adult.  I just used a little tote that I happened to have and made a little sign to go on it and added some curling ribbon to the top for the party.  It's waterproof, so it's safe for us to store in the garage and it won't take up too much space!

To help us make sure that no one brought the same item for the capsule, I used Punchbowl's potluck feature.  You simply set up a potluck list and your guests can select whatever item(s) they wish to bring.  There is an option for them to add an item that is not already on the list if you would like.  I made a few suggestions on mine and left a bunch of blank item spaces for guests to fill in.  This way, you won't end up with a dozen newspapers!

At the end of the day, everyone had a great time!  Ayden was happy with his gifts and sufficiently stuffed with cake.  Since we kept it pretty simple, cleanup was easy, so we got to really enjoy the party, too.  Now, there's only 360 days to plan his next birthday party!
CAKE!!


Tuesday, November 6, 2012

My First Vox Box!!!

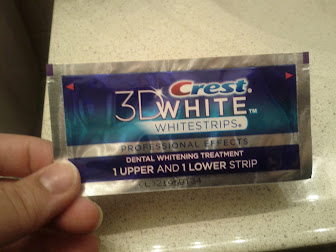
So a while back, I told you guys about Influenster.com.  Well today I got my first Vox Box from them!  Yay!!!  My first box is Crest 3D Whitestrips with Advanced Seal.  It claims to give professional effects in 20 days.  This is perfect with the holidays coming up...who doesn't want a white smile for all those Christmas pictures??  I'm so excited!

I'll be checking in and letting you all know how the kit is working...hopefully with some awesome before and after differences!  Have I mentioned that I'm excited?!

Thursday, October 18, 2012

Pumpkin Patch!


I think we can all agree that October would not be complete without a trip to the local pumpkin patch.  Our family went to Painted Oaks Academy for their annual pumpkin patch.  Not only do they have beautiful pumpkins to pick from but pony and hay rack rides for the kiddies!  Our little one is a bit too young this year, but he still had a good time looking at all the pumpkins and picking out his very own!

This is just the beginning, folks!  With pumpkin purchases complete, next comes the fun stuff...carving and cooking!  Stay tuned for some tasty pumpkin treats!
Happy Fall from our family to yours!

Influenster!

If you've never heard of Influenster, you need to check them out!  It's a great site that gives you freebies for doing what you already do!  I signed up and I'm so excited to get my first Vox Box!

So here's how it works...you sign up and earn badges by answering some basic questions about yourself (they don't sell your info...no worries!).  Then, if you qualify based on your answers, you get a Vox Box with some sample products to try and review.

They just recently relaunched their website so it's new and improved!  Check them out at www.influenster.com.  Let's get real...who doesn't love free stuff??  And honestly, when I find a product that I truly love and believe in, I tell my friends already anyway...so I'm getting free stuff just for being me!

Monday, September 10, 2012

Pink Dragon Fruit Frozen Yogurt

Recently, Aaron and I visited the Flea Market at the Central Florida Fairgrounds.  Aside from the typical flea market finds, there are several produce stands.  I happened upon one selling a limited variety of fresh, locally grown tropical fruit.  We purchased dragon fruit, lychee, and mamey but passed on the $60 jackfruit.  Jackfruit is a HUGE fruit...so $60 for the whole thing really isn't as bad as it sounds...but who in the heck would eat all that?!

Dragon fruit is BEAUTIFUL on the inside.  They come in either white or hot pink...ours were the hot pink variety!  So pretty!
Source: http://www.tropicalfruitgrowers.com/?page_id=546
This soft, delicately flavored fruit is almost too pretty to eat...almost.  

Since we're trying to be healthier, I decided this would be an excellent dessert!  So let's make it look like dessert and less like something 'good for you'...

Hardware:
Knife
Spoon
Small food processor or blender
Freezer-safe container

Software: 
One dragon fruit, ripe
1 cup Greek yogurt
4 packets Splenda (or your sweetener of choice...honey is another good option)

Gettin' down to business:

1.  Cut dragon fruit in half, lengthwise.  Using the spoon, scoop out the flesh into your processor.  Blend until no longer chunky (doesn't take very long!).

2.  Add yogurt and sweetener.  Blend until smooth.  

3.  Put in freezer-safe container and freeze until it reaches your desired consistency (I like mine mostly soft, Aaron likes his rock solid...so his went in over night).


Monday, August 27, 2012

Vegetable Stock

I'm not sure if I've mentioned it before, but my boyfriend is allergic to poultry.  Weird, I know, but true.  So all those recipes that call for chicken stock were off limits to our household, which was a real shame because they're so GOOD!  So a while back, I decided to just sub in some veggie stock because it's comparable.  What I didn't realize was how expensive it was.  I mean, really...it's at least $.50 more than chicken or beef stock!  What gives?!  So I said, "screw that" and decided to make my own.  Turns out...it's not hard!

First off, you have to have enough veggie trimmings and it's good to have a bit of variety or you're not going to have veggie stock, you'll just have broccoli water (I know because I did this once...learn from my mistakes!).  What I found works best for me is to trim and divide all my fresh veggies into meal-sized portions when I get home from the grocery store.  This kills two birds with one stone...I have ready to go veggies for our meals AND I make my stock.  Plus, I find my fridge looks more organized this way than just having random packages of veggies in there.  Anyway...

Wash everything thoroughly!  Unless, of course, you like the flavor of dirt...but let's just assume that we don't.  Wash 'em.  Cut everything into chunks.  They don't have to be perfect or anything...I just find they fit better into my pot in smaller chunks.  Plus, I think it gets more flavor out....you know, that whole surface area to mass thing.  I like to fill my big soup pot about half full of veggie trimmings.  I also throw in at least one whole onion chopped up and a couple tablespoons of minced garlic for extra flavor.  You can throw in whatever seasonings you like...I just like to keep mine simple and season it later when I use it in a recipe.  Then, I fill the pot up the rest of the way with water, leaving enough room so it won't boil over.  Then, I set it on the stove and have it cook at a boil for about an hour.  Let it cool, and using a mesh strainer, I separate the veggies from the stock.  Discard the veggies (if you have a compost bin, these are perfect for that!).  Make sure you let the stock cool down before refrigerating it.


If you're not going to use all this stock within the week, freeze it.  I prefer to freeze it in ice cube trays and then empty the trays into a gallon freezer bags.  My ice cubes are about 1/8 of a cup each, so I can easily take out just the amount that I need.

I really hope you enjoy this little tip!  It's certainly saved me a lot of money and made for some tasty food!

Sunday, August 12, 2012

Road Trip!

Just last month, my little family and I piled into our vehicle for the long drive from Orlando to Chicago for my boyfriend's family reunion.  We anticipated the drive taking at minimum 21 hours and we planned to drive the whole way there...no stopping (except for gas and potty breaks, of course!).  How does one do this with an 8 month old, you may ask.  Glad you asked!

Preparation!
Plum blends pack with "Boon"

Preparation is the name of the game when planning  a road trip with a little one.  The three big things on my list were easy to prepare formula for in the car, easy to serve baby food for in the car, and new toys to keep him happy.  Now I know most people wouldn't be crazy about feeding their children in the car like this, but hear me out.  He is perfectly capable of holding his own bottle and if he is fed while driving, all those stops can be used for stretching his little legs and moving around...not stuck in Mom's lap eating!  My only problem was the baby food...just sounded messy as all get out in a car seat, right?  Solution...squeezy fruit!  I'm sure there are other names for them but that's what we call them in our house.  I got 20 packs for $20 at Babies R Us on sale, and my little man can suck the food right out of the pack.  If your kiddo isn't crazy about sucking it out on their own, they make spoon attachments (called a Boon) so you can squeeze the food right into the spoon.


After getting the fruit packs, I got a couple packs of ready to feed bottles and had a ziploc bag full of nipples...easy as pie.  I put those and a few sippy cups (for water) and some little snacks into a small tote and stowed it on the floor in front of the car seat for easy access.  

Ayden playing with one of his new toys.
The last thing on my prep list was new toys.  Why new toys?  What's wrong with the toys he already has?  Well...they're boring.  He's already seen them and played with them.  So I got a few new things to keep his attention on the drive.  One important thing to note...while all the bells and whistles are cool on toys, it's key to get at least one silent toy.  Trust me, your sanity will thank me later.

How did it go?
Well the 21 hour trip ended up being 2 full days due to a blown transmission somewhere in GA.  If not for the help of family, friends, and the grace of God, we would still be there!  Ayden was a trooper through the whole thing...only fussed one time on the entire trip.  His car seat was mess free and had a blast with his new toys.  One thing I will say this experience has taught me is to pack extra...because you never know!


Please note...here I'm just talking about food and fun for baby on road trips.  There are certainly MANY more things you need...diapers, wipes, sunscreen, etc.  This isn't meant to be comprehensive!


Wednesday, June 27, 2012

Update

The purpose of this post is to simply let you know why I haven't posted in a while.  A couple of weeks ago, my family suffered a tragic loss.  My dad passed away suddenly at 46.  We are still in shock and coping as best we can.  The funeral was last week at his church and the show of love and support from his congregation was overwhelming.  Monday, we flew to our home state of Illinois to hold a small visitation for our family and burial.  We just arrived home today in Orlando.

Dad and I sometime in the early 90's
While this is a horrible time for our family, I can assure you that life will go on and we will get through this.  I simply ask for prayers and love for us during this time.  I promise you I will go back to my goofy self, posting all kinds of fun stuff when the time is right.  But for now...we grieve, we remember, we heal.

Wednesday, June 13, 2012

Cookie Time!

Not sure if I mentioned this already, but we live in a cookie house.  Some homes have cakes, brownies, or Little Debbies, but ours...we have cookies.  So I was having a cookie craving and went to the cupboard to gather my ingredients and then...*gasp!*...we have no...chocolate chips?!  WHAT?!  When did this travesty occur?  How could I have been so unprepared?!

Ok, so maybe I'm being a little dramatic.  But hey, when you want a cookie, it can feel like a matter of life or death!  What to do...well I have about a thousand cake mixes up there that I will probably never use, so I seriously considered making a cake.  Ugh, but then there's the whole thing where you have to let it cool and frost it and even then...it's just not a cookie!

Did you know you can make cookies from a cake mix?  So yeah...say good bye to my cake mixes and hello to tasty cookie goodness!  It's surprisingly easy and requires only two extra ingredients.  Like with cookies, you can mix in additional things like chocolate chips, raisins, etc.


Cake Mix Cookies
1 pkg cake mix (average size...not family size)
2 large eggs
1/3 cup vegetable oil

1.  Preheat oven to 350.  Mix all ingredients well.

2.  Spoon onto baking sheet.  Bake for 8-10 minutes.

3.  Allow to cool.  Frost if you like.


Monday, June 11, 2012

Organization I

Have you ever spent an entire day cleaning your house only to sit down at the end of the day and feel like you haven't accomplished anything?  I had one of those days.  I think I figured out what the problem is.  We have entirely too much crap.  Seriously.  It's just out of control.  See, my darling boyfriend is a pack rat.  He has kept some of the strangest things over the years...and he's attached to every single one of them.  Only in the last year or so since we found out we were expecting did he start to release his death-grip on his old crap.  

Before
My goal, to eliminate this problem (and hopefully make our next move a little easier) is to go through each problem area in our house and purge it of all the junk.  We agreed to start moving all said junk to the garage and have a garage sale to hopefully make a little change.  

Anyway...so that's the master plan.  Since I came upon this idea late in the day (but me being me, couldn't just wait until tomorrow to start), I chose to start small.  I have a cabinet on my side of the bedroom where I keep a few books and things.  It was a royal mess.  Just...ugh.  Thinking back to how it was, I'm so ashamed...but I will post pics anyway.  Yeah, I know...it's nasty...don't judge me.  

After emptying it out completely, I divided everything into categories:  reading material, stored decorations, gifts, stockpiled toiletries, keepsakes, stuff that goes somewhere else, and trash.  I ended up throwing a lot away and filling a laundry basket with stuff that didn't belong.  I put my toiletry items in those totes I bought at a garage sale for $1 and organized everything else.  I think it turned out beautifully and didn't cost me but the $1 I spent on those totes!  I also found that arranging books from tallest to shortest and keeping the bindings flush that it looks much cleaner.

After


Sunday, June 10, 2012

Sunday at the Farmer's Market

Every Sunday, Lake Eola in downtown Orlando, fills its sidewalks with tents full of yummy goodies and handmade items.  The sunshine and the fountain make the day a perfect day for a stroll through the market.  If you ever find yourself in the area, I recommend you check it out.  They have fresh, organic produce, kettle corn, orchids, handmade cutting boards, aprons, baby outfits...they also have a bar set up where you can get beer and wine (or all you can drink mimosas for $10!).  There are also a handful of food vendors with everything from your traditional foods (funnel cakes, hot dogs) to empanadas!  And that is just the beginning...there is much more!  They are dog and baby friendly, so the whole family can come!


Wednesday, June 6, 2012

Fun with Finger Paint

Since this is Aaron's first official Father's Day, I wanted to do something special for him.  Now, I'm not working, so I can't go out and get him the grill he drools over every time we go to Home Depot (yawn).  I asked him what he wanted and got the usual response of, "Dear, I don't need anything."  *Sigh*  Typical man...and they say WE'RE hard to figure out!  But let's just not go there...

So I asked myself...what do you get the man who doesn't want anything?  I suppose it should really be from Ayden, so maybe something Ayden can have a hand in?  He's only 7 months old, so there's not a lot he can do besides drool.  So I went to my trusty Pinterest board in search of inspiration.  Eureka!  I saw a pin I had about edible homemade finger paints...and another for art made from letter stickers creating sort of a negative image on a painting (sounds weird...you'll see what I mean).

So I made the finger paints...way easier than I expected.  I made three colors of which I thought would look cute together.  I took an 8x10 piece of canvas panel and, using letter stickers, added 'I love you'.  Canvas panel has the texture of canvas but it's not wrapped around a frame.  It's flat, so I figured it'd be easier to frame and if we didn't add a frame, I wouldn't have to worry about painting the edges.


Once the paints had cooled and the letters were affixed to the boards, I let Ayden have at it.  It took a bit of coaxing and showing him how it's done before he dove in.  I found that, at least for his age, it was easier to pour some paint on the panel and let him swirl it around.


Once the paint has dried (I let mine sit overnight), you can carefully peel the letters off, revealing the white beneath.  Some of the paint bled under on mine, but I think it actually looks pretty cool that way.

A tasty masterpiece


If you want to spend a little extra time and effort on this, you can paint the panel a solid color that you like and let your kids paint a different color over it...I personally prefer the white, though.

An additional word of caution...food coloring stains...so cover everything!  Also...have a bath ready to go for when your kids are finished...mind went directly into the sink to get suds up so we didn't mess up the rest of the house!

Ayden getting clean in the sink...he found Nemo!


Recipe for finger paints:
2 tbsp sugar
1/3 cup flour
1 cup water

1.  Add all ingredients to a saucepan.  Whisk until smooth.

2.  Heat to medium low and stir continuously until thickened. 


3.  Separate into cups and use food coloring to reach your desired color.  Let cool!


Monday, June 4, 2012

Company's Coming French Toast

Like most of you, when I have a house guest, I like to roll out the red carpet and make them feel welcome in my home.  I try to make sure their sheets are fresh, extra towels are in the bathroom, and that they always have a full belly.  This weekend, my sister came to visit and I made her this french toast because it's her favorite.  It's looks fancy, tastes amazing, and is surprisingly easy to make.

Pepperidge Farm Swirl Bread
The first secret to making 'fancy french toast' is the bread.  I cheat.  I totally cheat.  I don't go out and get gourmet brioche or anything like that.  I certainly don't make my own...seriously, what do I look like, Betty Crocker?  Plus, I have company over...the last thing I want to do is spend all day in the kitchen!  I get Pepperidge Farm Swirl Bread.  Publix has them on sale once and a while for buy one get one free...so I grab a couple of loaves and stick them in the freezer.  You can thaw two slices at a time (about 5 seconds in the microwave or a few minutes on the counter) or you can thaw the whole loaf (about 20 seconds in the microwave or about 30 minutes on the counter).  It give the french toast amazing flavor AND it looks pretty...and everyone will think you're a genius when they taste it!  

To make the french toast, you need to make the 'batter' which is basically a custard.  You can make it the night before if you like.    I adapted the recipe from one that Alton Brown uses.  His is great and all, but I don't usually have half and half in my house.  

Company's Coming French Toast

1 cup milk
2 tablespoons melted butter
3 eggs
2 tbsp honey (warmed in microwave for 20 seconds)
1/4 tsp salt
8 slices of swirl bread
Additional butter for griddle.


1. Preheat griddle to medium high heat and the oven to 350.  Mix the first 5 ingredients together with a whisk until smooth. 

2.  Coat griddle with butter (or use nonstick cooking spray...but the butter tastes better!).

3.  Dip bread in the custard mixture...give it a good dunk on each side.

4.  Lay carefully on the griddle and let cook on each side for 3 minutes.  Remove to the oven rack for 5 minutes.

5.  Serve hot with your choice of toppings.


Saturday, June 2, 2012

Garage Sale Finds

Now before you turn your nose up in the air and say, "I don't want to buy someone else's junk," hear me out!  Aaron and I regularly make a Saturday morning of driving around looking at garage sales for things that we can use or fix up and repurpose.  Surprisingly...it's a lot of fun.  Believe it or not, we've furnished our entire living room (minus the couches and the television) from garage sales. I've also gotten quite a few home decor items that are perfectly good and in style...you'd never know that I got them in someone's driveway.  The only difference is...I paid pennies on the dollar!  Jealous?

Anyway...I thought that I'd share some of my finds today with you...just in case you're a skeptic.  

What I got:
4 rectangular collapsible storage totes
1 kids hat from the Gap
1 Boppy pillow with case
1 St Louis Cardinals Teddy Bear 

How much did I spend today?  Bet you wouldn't guess...only $4!  The totes were $1 since they had some minor damage to the seams on the bottom...nothing I can't fix.  The Boppy pillow was $2 and came with the cover (regularly $39.99).  The hat ($12.95 at Gap.com) and bear were $0.50 each.  So...aside from the minor stitches that are needed on the totes and the washing I gave everything else...great stuff for a steal!   I even had some change left over to buy lemonade.

I will actually say one thing about second hand stuffed animals...I wouldn't give one to my child unless it's made to be washable.  The bear I bought will go to my Dad's house where he and his two dogs are big Cardinal's fans!

If you're interested in garage saleing in your area, check out the Yard Sale Treasure Map app on your smart phone.  You can access it on the go or plan your route at home and print it out.  

***If buying used baby/children items, ALWAYS check the recall list first!  When in doubt, opt out!***

Friday, June 1, 2012

Happy National Donut Day!

Did you know that June 1st is National Donut Day?  Me either...until Dunkin Donuts sent me an email stating that on this hallowed day, I can get a free donut with a drink purchase.  Yay!  To celebrate this special occasion, I made you all a 'Happy Donut Day' Card on Punchbowl.com!


Speaking of Punchbowl.com...if you haven't checked it out, you really should.  They are AWESOME!  Now, I'm not much for sending snail mail anything anymore, so this website is PERFECT for me.  You can plan an entire event...create invites, a potluck list, have guest polls, and even send thank you notes after the party!  They also, obviously, have a greeting card function as well.  I've personally used it to plan our Gender Reveal party and Ayden's baptism.  If you're like me and have family members who aren't so internet savvy, they do have an option to print out the invite...so you can do the mailing the old fashioned way with stamps (yes, they still make those!).

Click here to see card!

New Layout!

Hi all!  It was recently brought to my attention that in the 'dynamic view' it is difficult to locate the subscription options.  So...ta-da!  Easier to find 'stuff' over on the right.  >>>>>

Thanks for reading!

Thursday, May 31, 2012

Twice Baked Sweet Potatoes

Twice baked sweet potatoes...really, do I need to say more?  Tasty and healthy...comfort food that's not going to make you reach for your stretchy pants!!  Oh...and did I mention...easy?  My favorite word!

Twice Baked Sweet Potatoes

1 large sweet potato, halved lengthwise
1 tbsp butter/margarine
2 tbsp plain Greek yogurt
1 tbsp cinnamon sugar
2 tbsp chopped nuts (optional)

1.  Preheat oven to 400.  Place potato halves cut side down on a foil lined baking sheet.  Bake for 35 minutes or until tender.

2.  In a small bowl combine remaining ingredients and mix well.

3.  Once cooked, carefully spoon out the center of the potato halves, leaving a shell.

4.  Add the scooped potato to the mixture.  Mash and combine well.  Spoon back into the shells.

5.  Top with nuts and bake for an additional 3 minutes.


If you're more into the traditional sweet potato and marshmallow combination...replace the nuts with mini marshmallows and bake for only one minute or until they are nice and gooey...careful not to burn them!

Braised Beef Tenderloin

Recently, I purchased a package of pre-seasoned beef tenderloins.  The first one that I cooked, I baked in the oven...and I did so 'blind' as I do not have a meat thermometer (I know...shame on me...).  Needless to say, it was overdone and dry.  Since the package contained FOUR tenderloins, I figured I'd better either get a meat thermometer or find a better way to cook it.  You'd think that I drove my happy ass to the store and bought a meat thermometer.  Nope...of course not...that's too easy!  Instead, I set out to find a better way to cook it without one.

The first recipe I tried was for a braised beef tenderloin.  Most people probably wouldn't think to braise a tenderloin...I certainly hadn't thought about it before now.  Turns out, it's very good.  It cooks the meat evenly without overcooking it...it retains moisture and flavor, too.  Above all...it's crazy easy!

Braised Beef Tenderloin
1 petite beef tenderloin (mine was about a half a pound...the package in the photo contains 2)
4 cups of your broth/stock of choice (I used half beef and half homemade veggie stock...that's what the frozen cubes are)
Vegetables and seasonings of choice for flavor (For this recipe, I used a half cup sliced mushrooms, half a small onion and 2 tbsp minced garlic)


1.  Bring broth, seasonings and vegetables to a simmer in a large saucepan.

2.  Add meat and let simmer for 30 minutes.

3.  After 30 minutes, remove meat to serving dish and slice.  Serve with any veggies that were in the broth and spoon a little broth over the top.


Caramel Apple Dip

When I was a kid, my dad made this amazing caramel apple dip for me.  It was so good that I used to use the apple slices like a spoon when he wasn't looking!  Now that I'm "grown up" I figured I should learn to make it for myself.  Turns out...the magic dip isn't all that hard!  It only needs three ingredients that you might have lurking in your kitchen already...and you can make it ahead for a party if you need to.

What you need:
1 8oz package cream cheese
1/4 cup brown sugar
1/4 cup caramel ice cream topping
apples for dipping

1.  Cut cream cheese into cubes and soften in the microwave (30 seconds on high).  Using a hand mixer, blend until smooth.
2.  Add brown sugar.  Cream together until smooth with mixer.
 3.  Add caramel sauce.  Mix well.  Serve with apple slices!

That's it!  See...really easy.  If you're watching your sugar intake, you can substitute the caramel sauce for the sugar free version and swap regular brown sugar for the Splenda brown sugar blend (just be sure to consult the measurement conversion chart).  Yum!

Three Simple Recipes, One Healthy Meal

Before I begin the recipe portion of this post, I'd like to say thank you for reading!  Readership has spiked and I'm very excited to have all of you on my blog!  Please feel free to make comments and suggestions...I'd love to hear from you!


For tonight's dinner I decided to go simple...fish and veggies.  Light, healthy yet satisfying.  On the menu: balsamic glazed tilapia, oven roasted broccoli and corn on the cob.  Yum!


Roasted Broccoli:
2 cups broccoli florets
2 tbsp olive oil
2 tbsp Parmesan cheese
2 tbsp lemon juice
salt and pepper

1.  Toss broccoli in olive oil, salt, and pepper.  Put in a baking dish and bake for 20 minutes at 425.

2,  When done (you should be able to stick them with a fork and ends will be browned), sprinkle with cheese and lemon juice...toss to coat.

Corn on the Cob:

2 ears of corn, shucked and cleaned
4 tbsp butter/margarine
garlic powder
Cajun seasoning

like this
1.  Cut lengths of foil big enough to wrap each ear in.  Add butter and seasonings (place in the center and arrange it so that it will go the length of the ear...as pictured).

2.  Add ear on top of butter and seasonings.  Wrap tightly.

3.  Place in a baking dish or on a baking sheet and bake for 30 minutes in 425 oven.  *Cook times may vary based on the size of the ear of corn.

4.  Carefully unwrap and place in your corn holder and drizzle with seasoned, melted butter.

Balsamic Glazed Tilapia:

2 tilapia fillets
2 tbsp olive oil
1/4 cup balsamic vinegar
2 tbsp minced garlic
salt and pepper

1.  Add garlic and balsamic to small saucepan.  Simmer until it reaches a syrupy consistency...about 10 minutes.

2.  Preheat oil in a skillet over medium heat.  Season fillets with salt and pepper.  Saute approximately 3 minutes on each side or until cooked through.  This time may vary based on the thickness of your fish.

3.  Pour balsamic glaze over fish and spoon it over the fish to coat.

4.  Carefully remove fish to plate and serve.